Today should be the first Free Magento Extension or go online. in Magento Connect be provided directly to. Since this is not so easy and I unfortunately no simple German-at best- Found instructions, I will here represent the actual process once for all, the future “only” just want to make a quick extension without many extras ready.
So it is a so called. Package thus a Package be created, then what about Magento Connect is installed (we use here the Magento CE Version 1.5.1.0). Condition is, that the respective Extension on the Magento System is installed from which it will be packed!
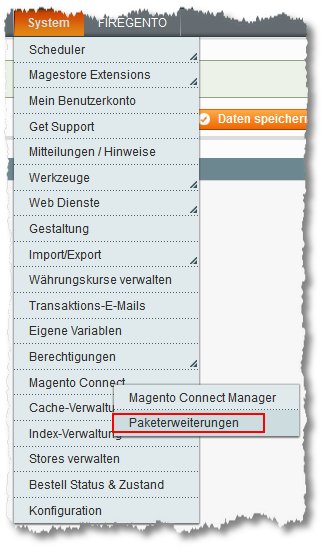 1. In Magento backend we go System > Magento Connect > Package extensions
2. Under the heading “Paketinfo” now be given general information about the upload extension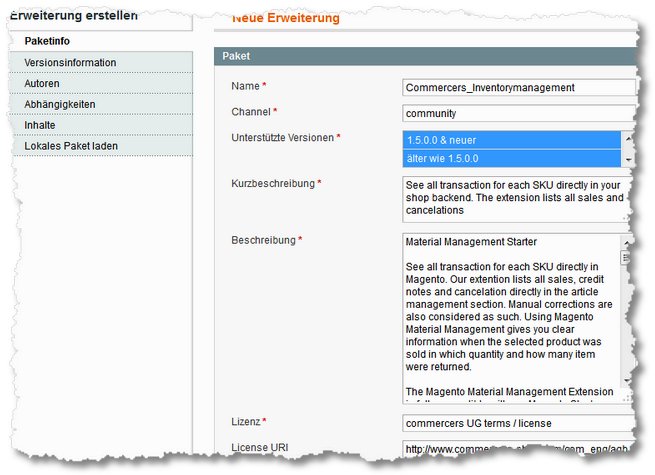
– This includes the name of the extension, here where no dial tone are to be used. It is also important, that the United- and is case sensitive.
– Furthermore, the so called. Channel. Here is currently internally generated Extensions / Module immer “community” registered (beautiful Magento Version >= 1.5. In Magento versions < 1.5 must here “connect.magentocommerce.com / community” be entered)
– At “Supported Versions” simply make the appropriate selection. (Hold down CTRL for multiple)
– Register with a simple text description. In contrast to the Magento Connect description here is no maximum number of 110 Character set. Even in the description is no real limit specified. HTML is not provided.
– For license to enter the license name entsprechenen. Examples GNU, BSD, AFL…or be write your own. Gives the complete overview e.g. it. at Magento Connect or in the wiki (Link below). Then enter the URL for the license.
3. In next version information:
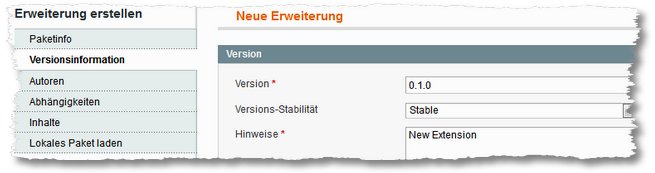
– The complete release notes. This is rel. intuitive.
4. In the next point, the authors stated:

Here is entered in name as desired. Users at the User (User-, no screen) Name, or at the Magentocommerce. Magento Connect angemeldet ist. In an email address according to the email address.
5. The dependencies are a little less intuitive:
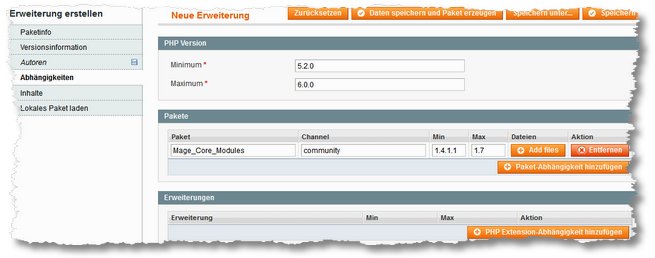
– It must be registered with the PHP version, Minimum requirement is that these. With us, we have generally 5.2.0 and registered as a maximum (tested) 6.0.0.
– Now you can enter more dependencies on other packages and Magento Extensions. We have assumed, that the Magento (Core) Version 1.4.1.1 as the smallest possible and the 1.7 maximum must be installed as, To install the extension can. When installing via the Magento Connect Manager therefore tested first, whether any of these versions is present. This is not the case, bietet der Installer an die fehlenden Stellen zu installieren. If necessary, one should not omit this.
6. Now comes the most important part: Which files are packed?

To make this clearer, Here is an overview of the necessary files and folders of our Magento ERP starter Extension. This is really two extensions. Once a general Commercers management extension and the actual ERP Extension, the administrator backend capable Warenab- and additions in detail to see per item.
For the code of the basic extension folder: app/code/local/Commercers/Commercers/
For the code of the folder WaWiextension: app/code/local/Commercers/Inventorymanagement/
For the layout of the file WaWiextension: app/design/adminhtml/default/default/layout/inventorymanagement.xml
For the activation of the reason the files extension: app/etc/modules/Commercers_Commercers.xml
For the activation of the file WaWiextension: app/etc/modules/Commercers_Inventorymanagement.xml
For the German translation of the basic extension of file: app/locale/de_DE/Commercers_Commercers.csv
For the German translation of the file WaWiextension: app/locale/de_DE/Commercers_Inventorymanagement.csv
These data are now to be packed in the extension.
In content > The aim now, various kinds of data are selected:
Magento Local module file this refers to the folder app/code/local
Magento Community module file this refers to the folder app/code/community
Magento Core team module file this refers to the folder app/code/core
Magento User Interface (layouts, templates) this refers to the folder app/design
Magento Global Configuration this refers to the folder app / etc
Magento PHP Library file this refers to the folder lib
Magento Local language file this refers to the folder app / local
Magento Media library this refers to the folder media
Magento Theme Skin (Images, CSS, JS) this refers to the folder skin
Magento Other web accessible file This refers to the Magento root folder
Magento PHPUnit test this refers to the folder tests
Magento other This refers to the Magento root folder
The first step is therefore now be seen for what a Datatype is needed. Since e.g.. Our code for the base extension in a folder in the app / code / local directory, we assume in this case the Magento Local module file and in the field enter the remaining path path relative to the already defined app/code/local a. Here, then, Commercers / Commercers. Since it is a folder and not a single file, is at “Art” then “Recursively” selected. Thus is set, that all files and folders are included in this directory, and under specified. By entering “Included” and “Ignore“, could define more precise details. However, these are only used, when “Recursively” was chosen and not “File“, the other possibility, to select individual files. The input for the WaWiextension is correspondingly.
Then the layout of the XML extension (a file) take, this is a kind “File” selected and Magento User Interface (layouts, templates) chosen, completes the path directly to the XML file. Here, then, adminhtml/default/default/layout/inventorymanagement.xml
Since the remaining files are individually, so doing, and the corresponding target type selected. In the language packs would be the possibility that “Included” To use feature, e.g. if a translation file with us. “Commercers_Commercers.csv in de_DE, en_US, en_GB lie and possibly other folders has. Then in path can not be entered, front course Magento Local language file Recursive directory then and now the important: At “Included” then “#Commercers_Commercers.csv #”. Now would be taken including all folders. the file, containing them. With us there is only one and therefore we do not need this.
7. If everything is entered correctly, the package by clicking “Save data and package produce” be completed. About “Lokales laden Package” ready existing packages could be loaded, to update or edit.
8. After you create the package in the Magento root directory should be under var / connect (oder var / pear) the packet data are (You can also provide an alternative path through “Save…” invest).
9. Then logs in with his Account at Magento Connect and goes there to be Profile and on “Developers“.
10. Now on “Add New Extension” click.
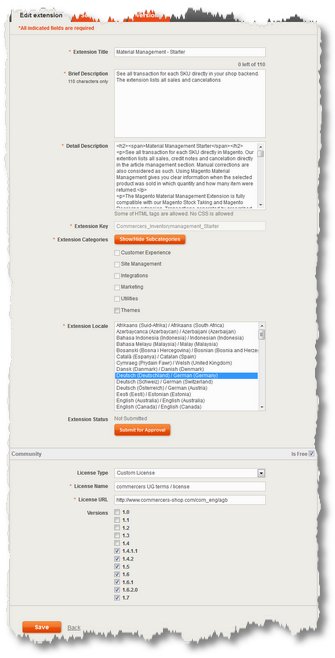 Now, here again all the relevant data as typed name, Descriptions etc. However, there are a few “Specialties” this range (apart from the fact that it is extremly slow).
– Thus, the “Extension Categories” be selected only, when before on “Show/Hide Subcategories” click. Here then can be selected up to three.
– “Is free” and other data can be collected only below, when the compatible “Versions” has chosen.
– When you click “Is free” click, must above “Extension Key” be entered. This MUST exactly identical be named the newly created extension. Including. Under all lines etc.
– Then on “Save” click.
– The extension itself is then on the tab “Versions” uploaded. For this purpose only. tgz file select. The name of this is usually done on the extension name and version.
– This one seems to have noted, that (although when creating versions 1.4 bus 1.7 has indicated), that for Magento versions <1.5 another version must provide. This version can be found in the folder var / pear. This version is then in the Magento Connect compatibility statement 1.4, 1.4.1.1, 1.4.2 uploaded. Then (after uploading) the version from the var / connect folder with the information of version 1.5…..1.7.
– Now you can add some more screenshots.
– Everything is uploaded, or the extension must still be released by the team of Magento. approved werden. For this to “Submit for Approval” click. Then told, that up to this 10 May take days….(fortunately does not take the extension upload quite as long 🙂 )
More information is HERE and also HERE. Are the general rules and instructions are available HERE als PDF.
Is highly charged and described extension of ERP starter it HERE.